Pages

Wednesday, April 21, 2010

Easy Mother's Day Card


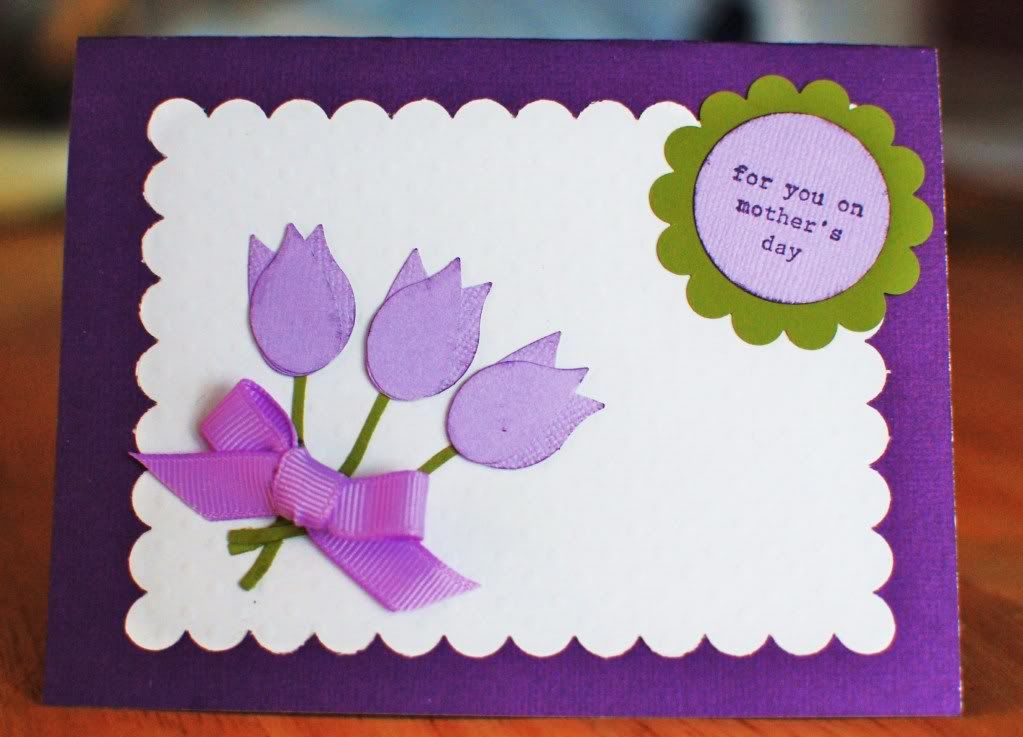
Here is the card I made to send Travis's Grammy Jo for Mother's Day. This turned out to be one of the easiest cards to make!
The make the tulips, I used the wings from Stampin' Up's 2 Step Bird Punch.
I wish I could take credit for this idea. Unfortunately, I am not that creative. I actually found several cards online with these tulips, so I'm not sure where the original idea came from. I used this card as my inspiration card.
For the white cardstock in the middle I used my scallop edge punch (also from Stampin' Up). It's hard to tell in the picture, but I also ran it through my Big Shot machine to give it a polka dot texture.
I am completely blanking as to which stamp set I used for the "For you on Mother's Day" circle.... It has flowers.... and yeah that's all I remember. It's a cute set though.
Then I just added a bow to the bottom of the tulips, and that was it! Super easy, and I think it turned out pretty. I hope she likes it!

Monday, April 19, 2010

I Heart Faces Collage

Are you tired of I heart faces stuff yet?? :D
I wasn't actually going to participate in this one, but I took some pictures of Madelyn the other day that I loved and wanted to make into a collage anyway. And, as it turns out, that is the I Heart Faces challenge this week!

So here is my beautiful Miss Madelyn. She wanted to play outside the other day, so I decided it would be a good time to do some Bible reading. She saw me, and asked if she could look at it. Madelyn LOVES to flip through my Bible and look at the pages.
I pray she never loses that love :)


(click on the photo to see it larger)


Friday, April 16, 2010

Fix-It-Friday #50


It's that time again! I've decided to give Fix-It-Friday another go. If you want to participate, or see the other great fixes, go to the I Heart Faces website.

Here is the original:

And here it is after my fix (using PSE8):

Ok, let me just say this girl is gorgeous!
First thing I did was brighten the whole image using the brightness/contrast button.
Then I used the lasso tool to select the eyes, and selected unsharp mask. Then I brigtened them and bumped up the contrast a bit, again using the brightness/contrast option.
Next I smoothed out her skin using the spot healing brush tool (love this tool!)
Next I used Pioneer Woman's "Colorized" action (I turned down the opacity to 75%)
And finally, I reduced the noise in the photo using Windows Live Photo Gallery (PSE probably has a noise reduction option, but I have no idea where it is)
I think that's it! I played around with this one a lot, so it's quite possible I forgot something or I have my steps in the wrong order. Next week I plan to write it down :)

Friday, April 9, 2010

Easter Sunday... (and the worlds best pie)

Easter Sunday was a fun day in our house. Madelyn must have known it was a special day, because she awoke at 5:30AM. AWESOME!
We decided to start our early day with her Easter basket.
Madelyn was extra excited about getting a basket this year. The week before she helped me pick out two baskets to give to our friend Cindy, who was collecting them to take to kids at the children's hospital.
So she was very excited to get one of her own.
Photobucket

She loved her Curious George socks (or as she calls him, Monkey George)
Photobucket

Photobucket

And her stickers
Photobucket

Photobucket


And Curious George notebook and pencil set
(sidenote: all Easter basket goodies, with the exception of her Veggie Tales DVD and Cabbage Patch doll, came from Target's $1 section. Score!)
Photobucket

Then (well, 3 or 4 hours later since she woke at the crack of dawn) it was time to get dressed for the most important part of the day, church.
Photobucket

Photobucket

After church Madelyn got to go on her first Easter egg hunt. It was very windy and a bit warm, but she had a blast! Definitely a fan of the egg hunt. When all was said and done she had enough candy to last us the rest of the year.
Photobucket

Photobucket

Photobucket

Photobucket

Easter was a special day for me, too.
After giving up sweets for Lent, it was finally time to enjoy some sugar! Not wanting to waste any time, I decided against making something from scratch.
Photobucket

But lets be honest, I could never make anything as wonderfully beautiful as this:
Photobucket

I sliced a piece that seemed to be a perfectly reasonable size...
Photobucket

And almost immediately went into a sugar coma.
Seriously, this thing is RICH. Especially for someone who hasn't ate sugar in a while.


However, it was it was completely worth it.
Photobucket

Happy (late) Easter!

Friday, April 2, 2010

Fix-It Friday #49

It's time for my first Fix-It Friday!
I love the I Heart Faces website. Every Friday they have a feature called Fix-It Friday, where the readers are encouraged edit a photo, and then share it with everyone. It's so interesting to see how different people edit the same photo.
Since I just got Photoshop Elements 8, I decided to try out this week.

Disclaimer: I am by no means a pro at this. In fact, I'm pretty sure I have no idea what I am doing. But there is no better way to learn then to just jump right in, right? So here it goes!

Here is the before:


After #1:


After #2

Wednesday, March 10, 2010

Signs of Spring

It's almost here!
No more snow, no more wearing layers and layers of clothes (and still being cold), no more going out in the cold to start the car on only to go back out into the cold when it warms up, no more sitting inside eating junk food in front of the tv (ok we might still do that last one)

We're been seeing the first signs of spring over the last couple of days.

Like flowers starting to come up


And thunderstorms


And the first hail of the year


And of course... FISHING!

Madelyn was so excited to go fishing with her daddy


As soon as her bobber hit the water she said "I think I got something!"
This went on about 10 times


She didn't catch anything, but I think she had fun anyway


Maybe next time!

Thursday, March 4, 2010

March Stampin' Up! Project

Every month our Stampin' Up! group meets to make cards, eat good food, and chat. Tons of fun, and it's helped me discover that I'm kinda crafty after all!

Each month we are challenged to make a project at home, and then bring it to show the group. We vote on our favorites. This month our challenge was to create a container.
I decided to make a candle box with matching candle.
I found the idea and tutorial for the box here
And here is my version:


I wanted to keep my box simple and modern, so I used black and white cardstock. I stamped both the box the box and candle with Stampin' Up's Medallion stamp using their basic black ink.
(Sidenote, I just bought this stamp and I am in LOVE. I'm already thinking of lots of project ideas to use with this stamp. It's so pretty)

Some tips I learned while doing this project:

*Stamp after you have scored the paper, but before you fold, so you know exactly where the folds will be.
*I dipped a plain gold brad in glue, then black gitter for the piece in the center of the box. Make sure you remember to punch your hole and add the brad before folding the box.
*For my final candle I did not use wax paper like the instructions say. The time I tried that it was a slight disaster. Some of the wax paper didn't melt right, so it was bubbly and rough feeling. I think I probably just did it wrong, because every tutorial on stamping candles I find say to use the wax paper.
Instead, I just stamped a piece of tissue paper, cut it out, layed it on the candle, and heated it slowly with my embossing tool. It turned out much smoother that time.
*Make sure you keep the embossing tool moving, if you let it stay in one spot too long the tissue will yellow.

So that's it! I don't know that it will actually win anything, but I'm really pleased with how it turned out :)

Stayed tuned, I'm sure there will be a lot more projects with this medallion stamp to come!

Term of Use